premiere-pro-mcp@1.29.0 package with its CEP compatibility bridge. Install the specific package, inspect the exposed capabilities, confirm the assistant can connect to Premiere with the connection tool, and try the workflow on sample media before using project media.
For this workflow, use the independent Premiere Pro MCP project documented by the project site for premiere-pro-mcp. Pin the package version in your MCP config. That matters because another Premiere MCP package uses the same global command name, so an unpinned or copied install command can put you on the wrong implementation.
This article uses the manual setup for premiere-pro-mcp@1.29.0: Node.js 20.19 or newer, the package’s CEP installer, its doctor command, and the exact MCP JSON for that version.
We tested this connector on macOS 26.2 with Premiere Pro 26.5.2 and Node.js 25.8.1. We used its MCP tools to assemble three generated test clips, save the project, close it, and reopen it. Claude Desktop 4.4212.0 then inspected the connection and timeline. This verifies the connector operations and Claude’s inspection; we have not tested Claude planning the full assembly from a single prompt.
Where this setup fits
Choose an installation method
The project also offers a Desktop bundle route for Claude Desktop. That route is convenient because the released bundle contains the local server, while you download the Premiere connector separately. If you're setting up a single Claude Desktop workstation and want the shortest path, the bundle can be a good first option. Use the manual setup when you need to document the setup, configure a different MCP client, or keep the package version pinned. Cursor, VS Code / Copilot, Claude Desktop, and other MCP clients can use this style of local server configuration if they support custom MCP servers. The manual setup has three moving parts:- Node.js 20.19 or newer on the workstation.
- The
premiere-pro-mcp@1.29.0package run throughnpx. - The package’s installer for the Premiere-side CEP compatibility bridge.
Install the CEP compatibility bridge
Start with Premiere closed, or be prepared to restart it after the install, and confirm Node is current enough:node --version
npx --yes premiere-pro-mcp@1.29.0 --install-cep
PlayerDebugMode preferences to allow unsigned CEP extensions. This applies to the CEP host, not just this one panel, so install a connector you trust. It lets the local bridge run inside Premiere; it does not upload media. This package disables raw ExtendScript by default.
After the bridge install, run the project’s diagnostic command:
npx --yes premiere-pro-mcp@1.29.0 --doctor
--doctor as a local package and configuration readiness report. It checks the local setup; you'll verify whether the assistant can connect to Premiere later with the connection tool. If it says the bridge or environment isn't ready, fix that before editing. Don't compensate with commands from a different Premiere MCP project, because the package names and global command behavior can overlap.
Add the MCP server to your client
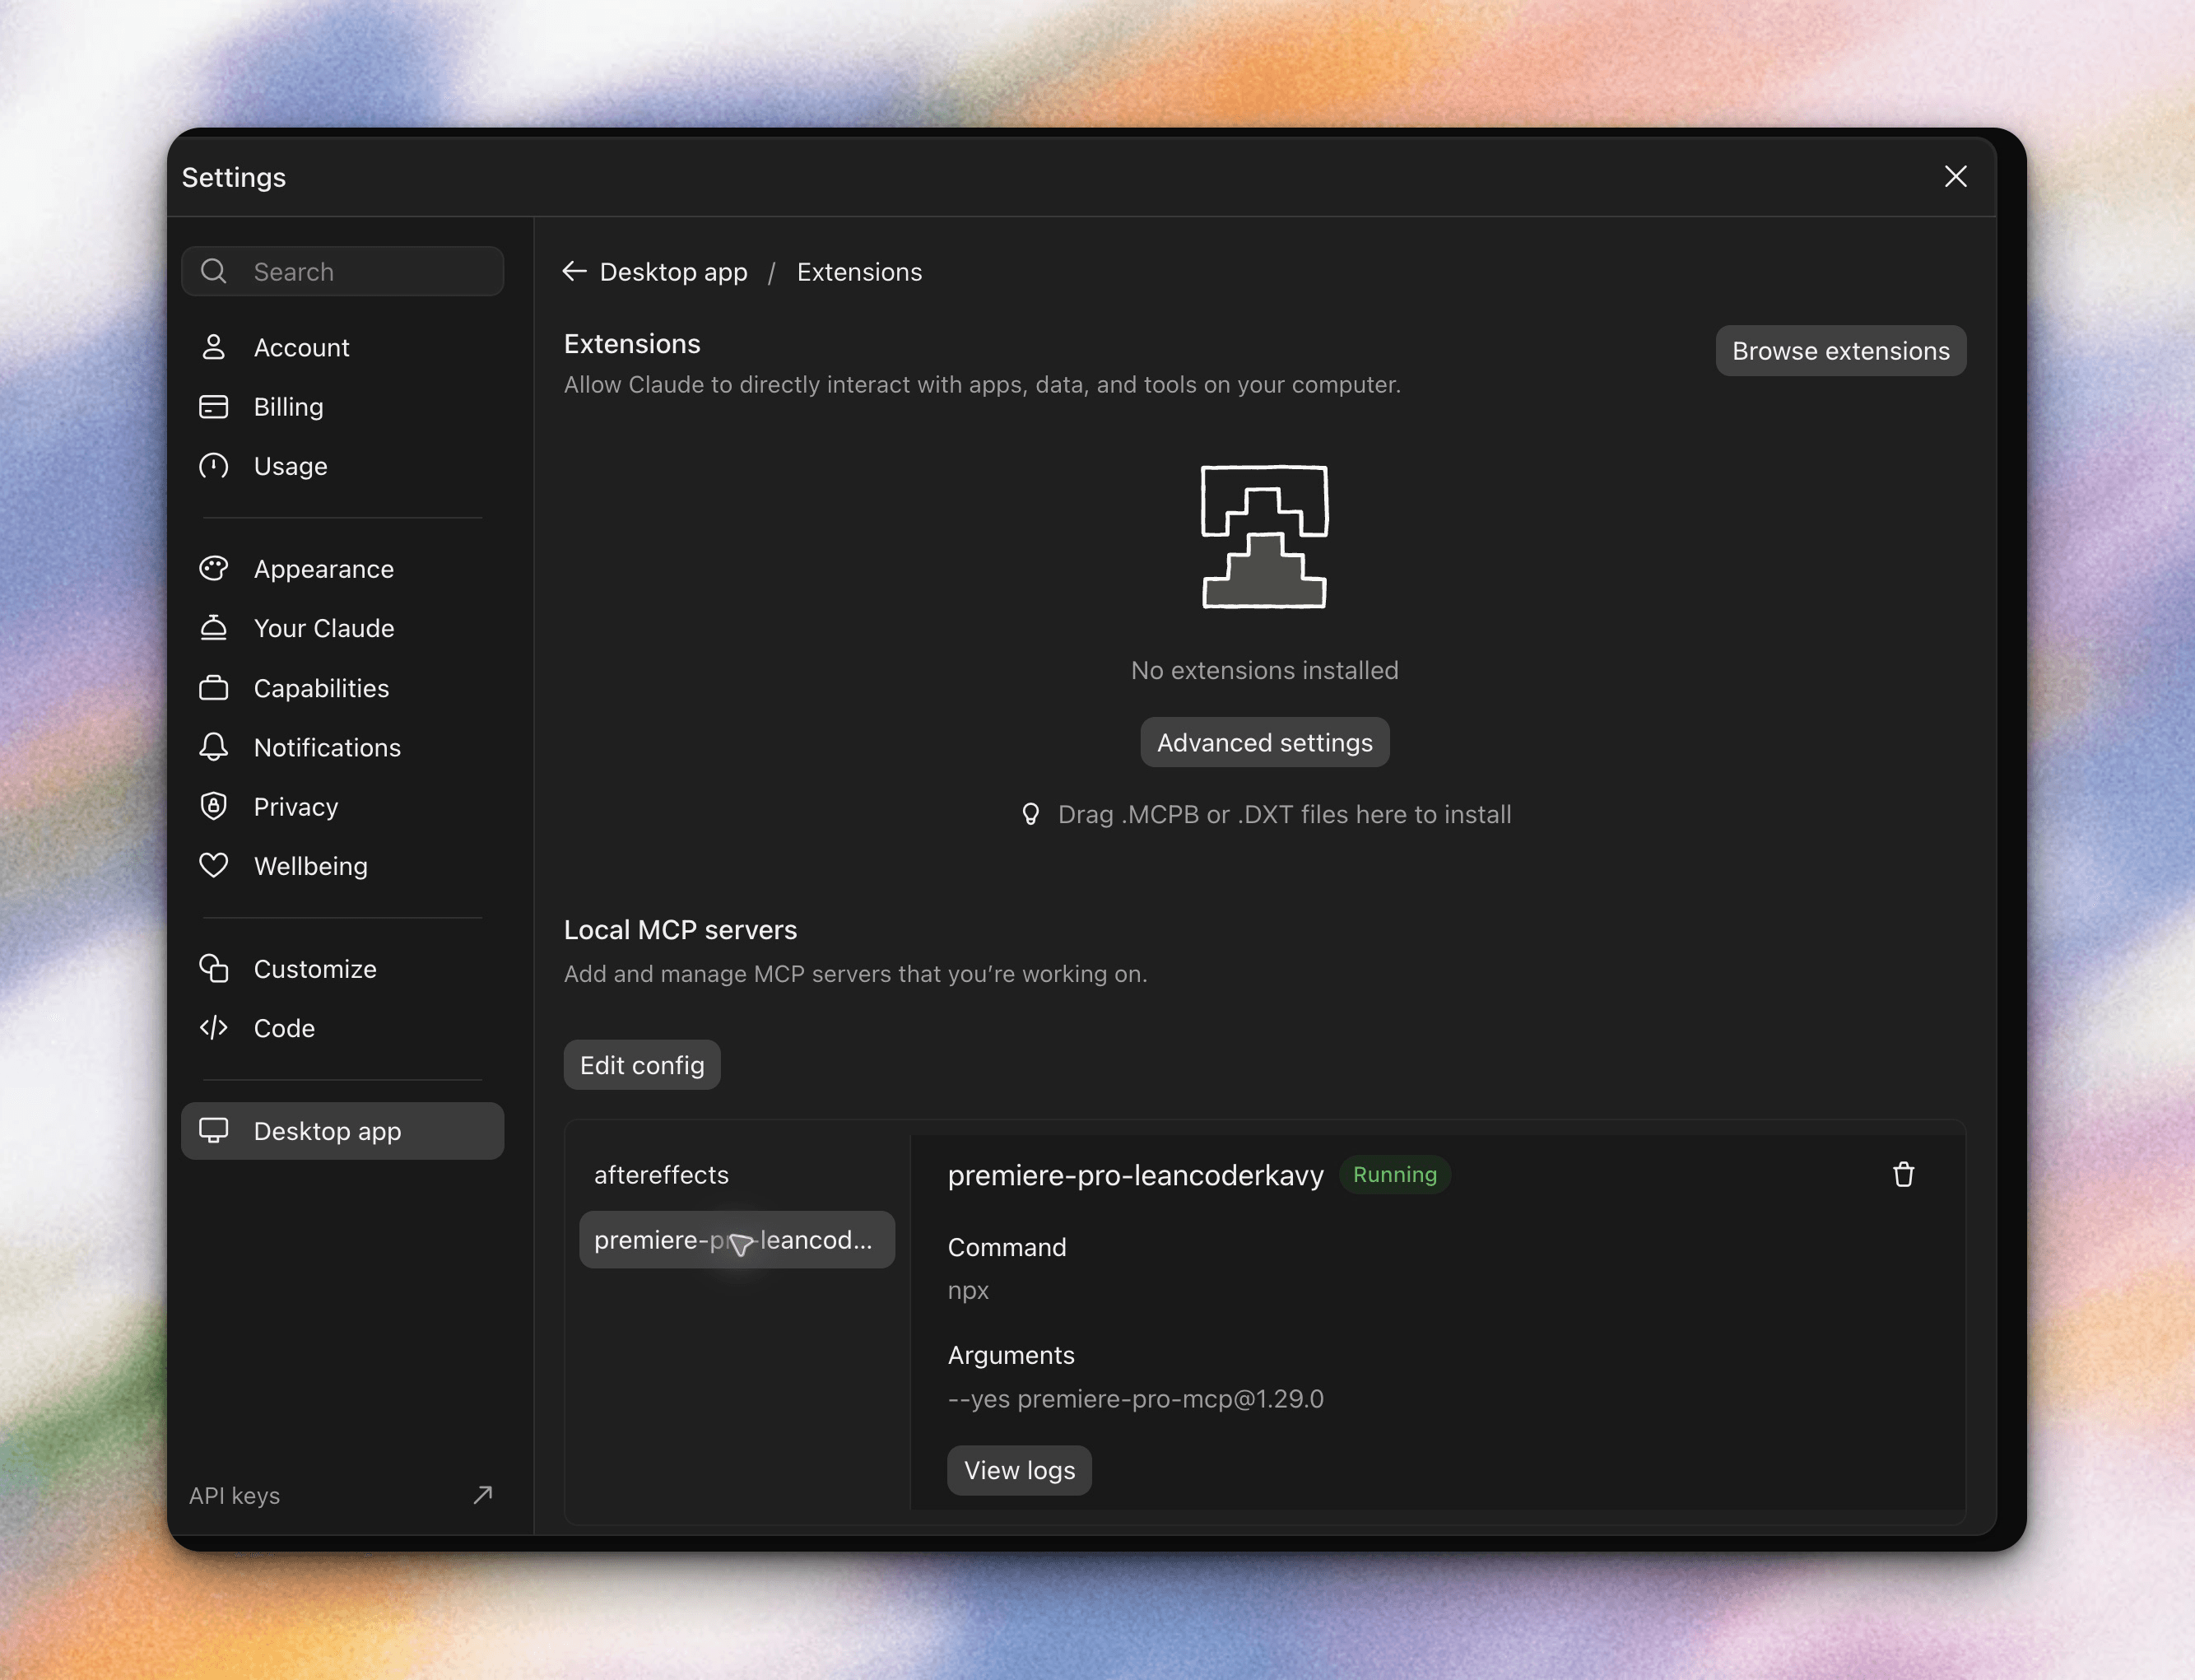
In Claude Desktop 4.4212.0, open Settings > Desktop app, choose Manage beside Extensions, then find Local MCP servers > Edit config. Add this server entry to the configuration file:{
"mcpServers": {
"premiere-pro-leancoderkavy": {
"command": "npx",
"args": [
"--yes",
"premiere-pro-mcp@1.29.0"
]
}
}
}
premiere-pro-leancoderkavy is useful because it makes the package identity clear inside clients that show multiple MCP servers.
Restart the MCP client after changing the config. If your client has a reconnect or refresh action for MCP servers, use it, but a full restart is the simplest way to remove doubt during the first setup.
Open the Premiere extension
Launch Premiere Pro and open a new project or a disposable copy of an existing project, then open the installed extension from Premiere’s extension menu: Window > Extensions > MCP for Adobe Premiere Pro The panel should show Connector running, which is the Premiere-side confirmation. It tells you the bridge panel is alive inside Premiere, but it doesn't yet prove that your assistant can inspect the project through MCP.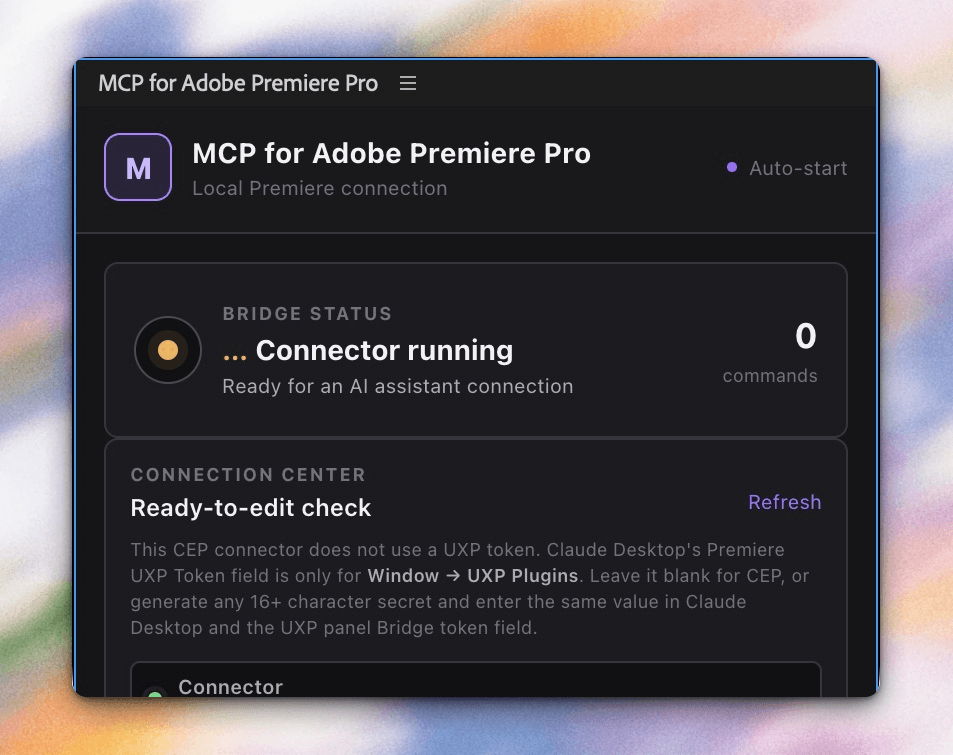
get_capabilities and summarize the available Premiere capability profile. This should tell you whether the assistant sees inspection tools, editing tools, export-related tools, filesystem-related tools, and any gated or disabled unsafe scripting capabilities.
Then run the read-only connection test:
Safely check my Premiere connection with verify_premiere_connection. Make no changes.
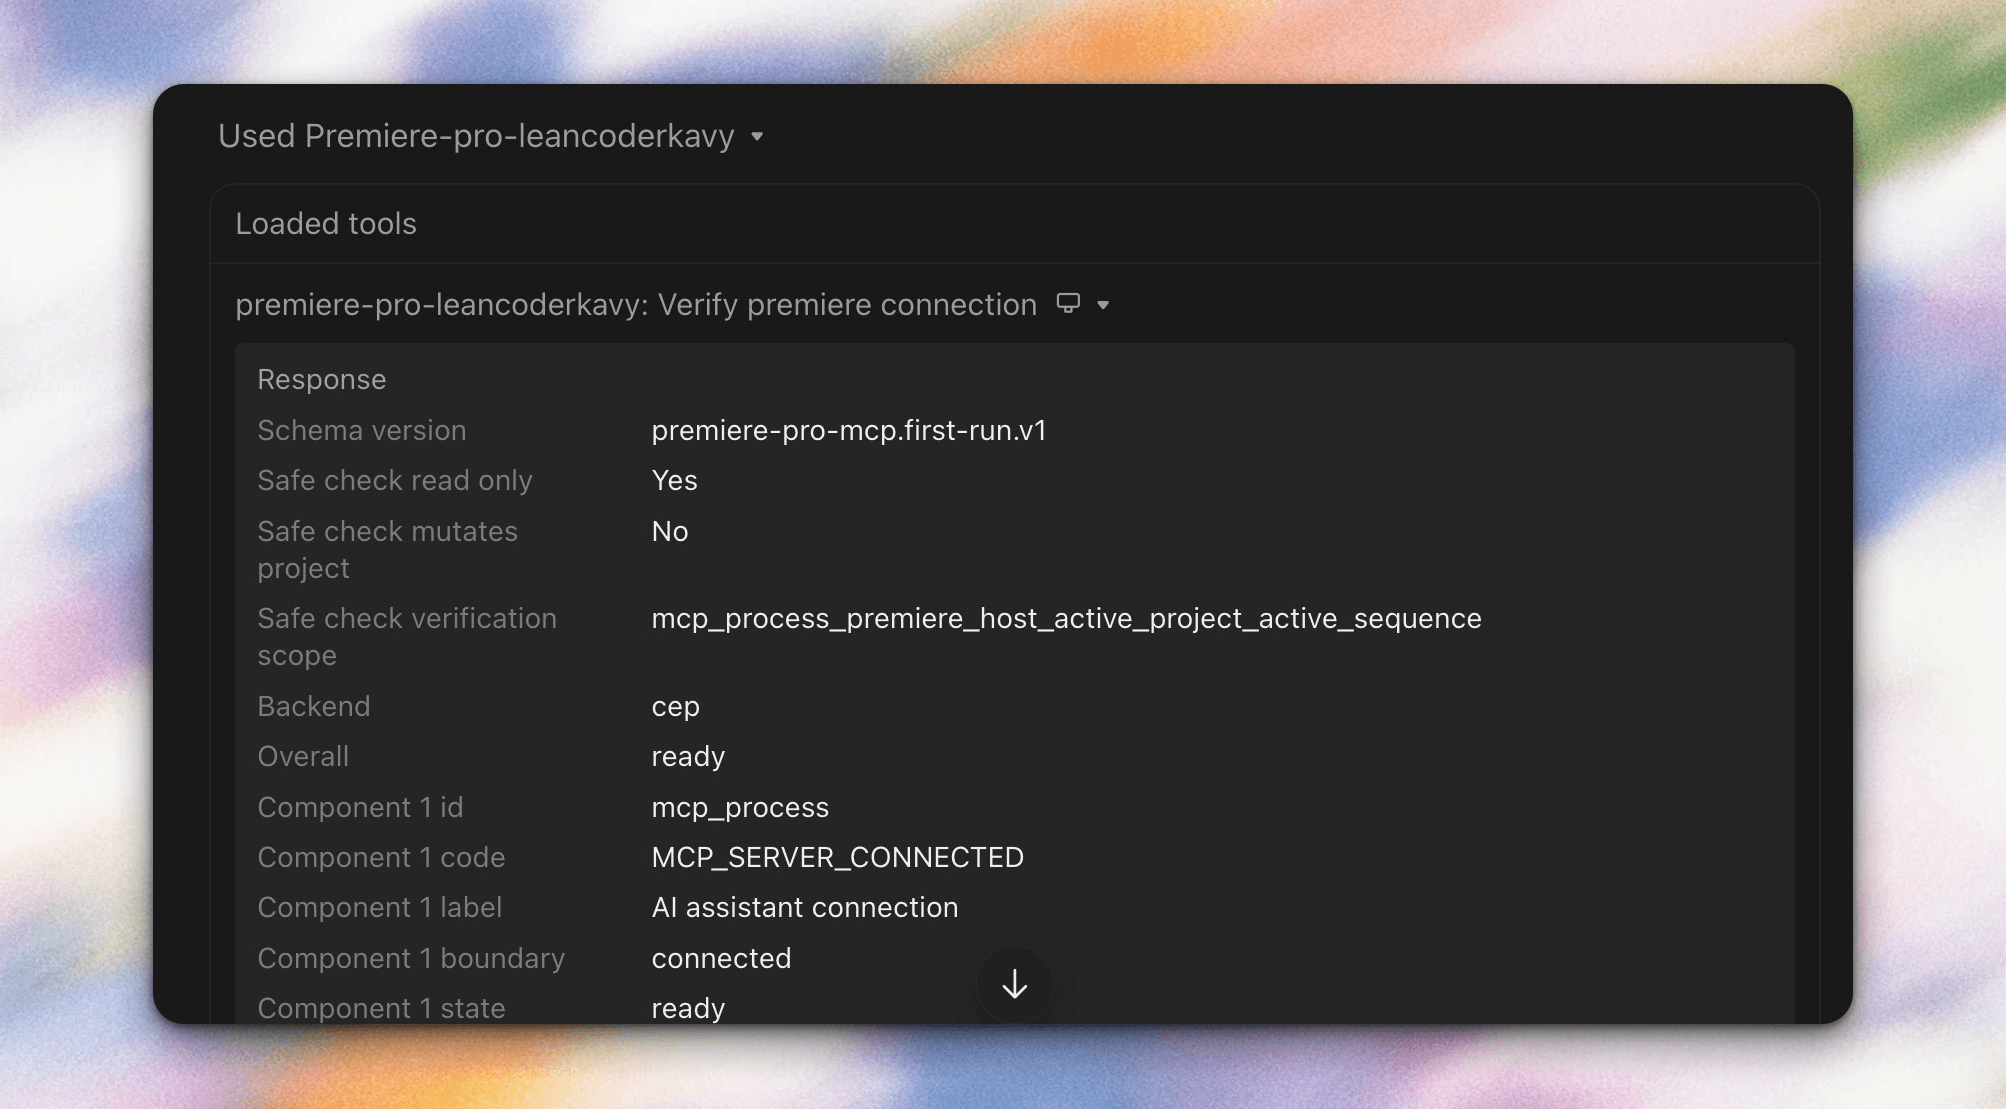
needs_attention because there was no active sequence. The MCP server and Premiere connector were both connected. Once we created and opened the test sequence, the same check returned ready. Read the individual component results before treating every needs_attention response as an installation failure.
Build a three-clip timeline
Use three short matching 24 fps test files that you can afford to throw away: camera test clips, generated slates, or sample media. Each source should be at least five seconds long, and this test uses exactly five seconds, or 120 sequence frames, from each clip. Put them somewhere with stable local paths, not a temporary downloads folder that may move later.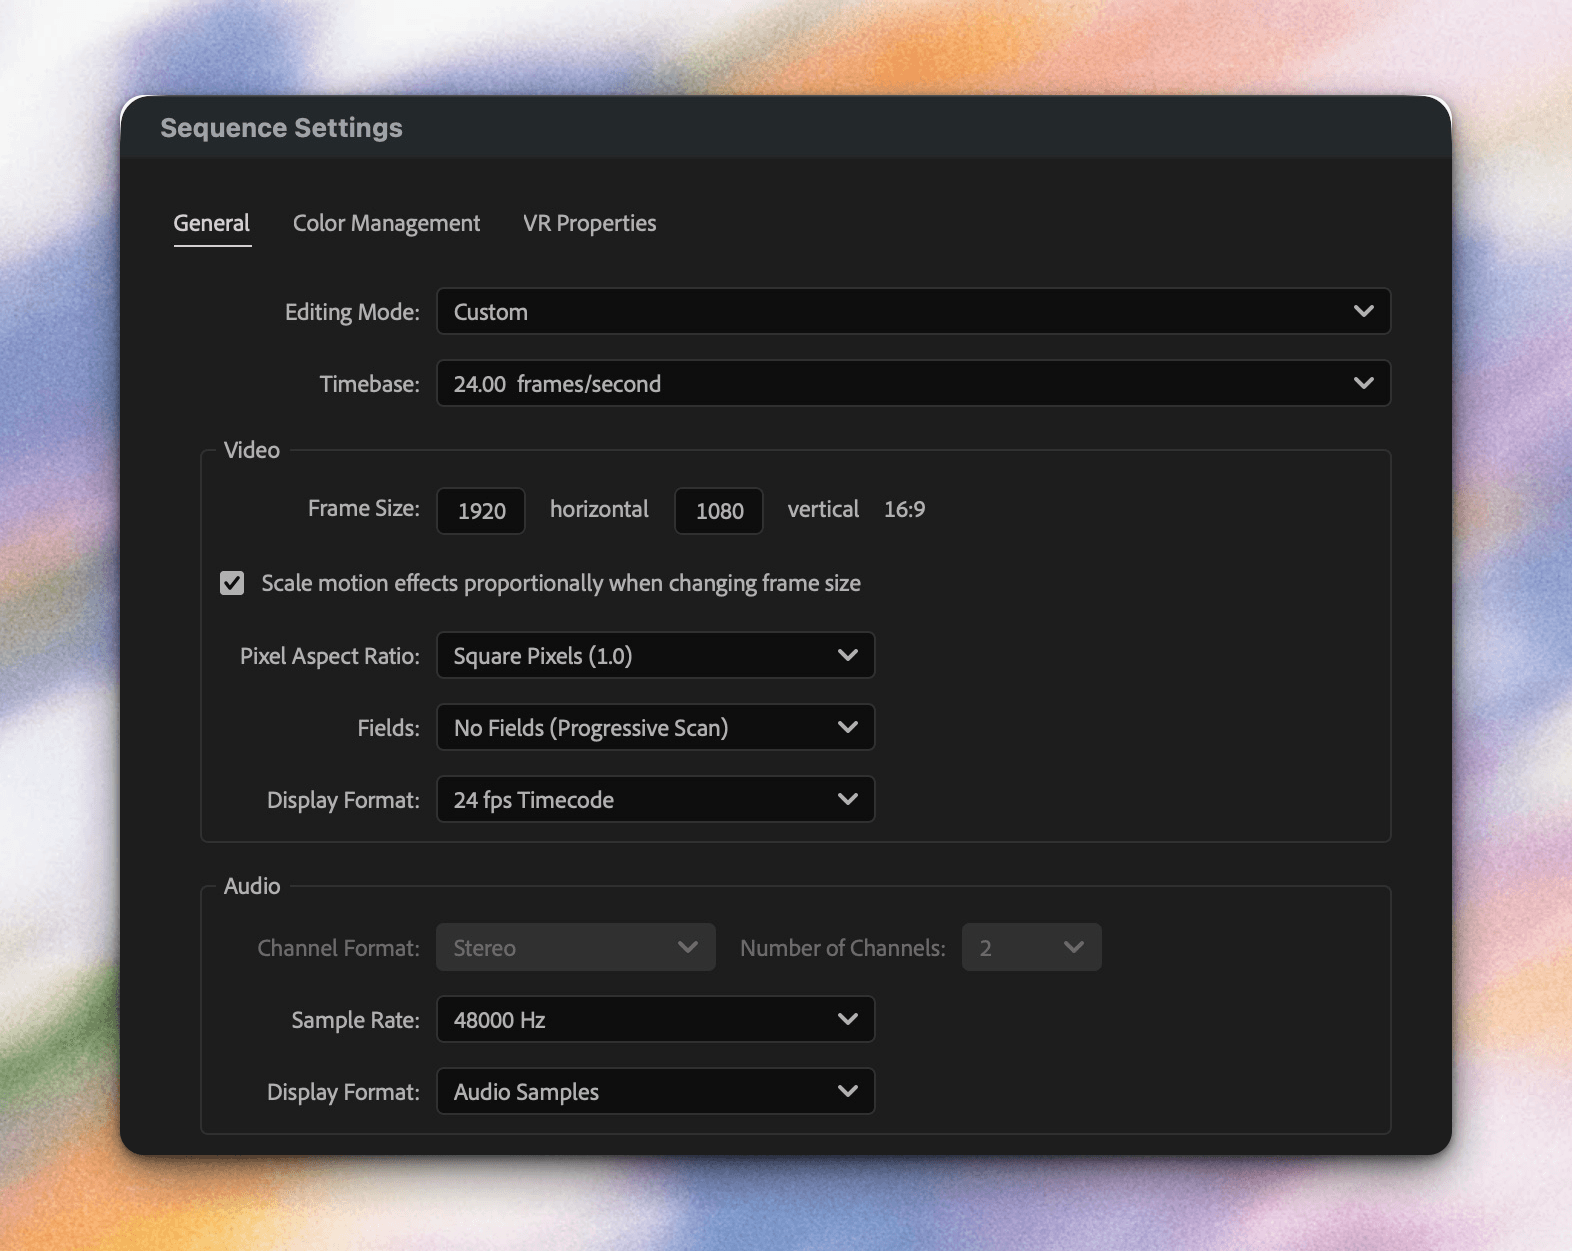
Aspect_MCP_Three_Clip_Tutorial.prproj.
Create a new Premiere project or save a copy of a blank test project. Give the assistant an explicit request like this:
In the open Premiere project, import these three local 24 fps media files:

/path/to/clip_01.mov
/path/to/clip_02.mov
/path/to/clip_03.mov

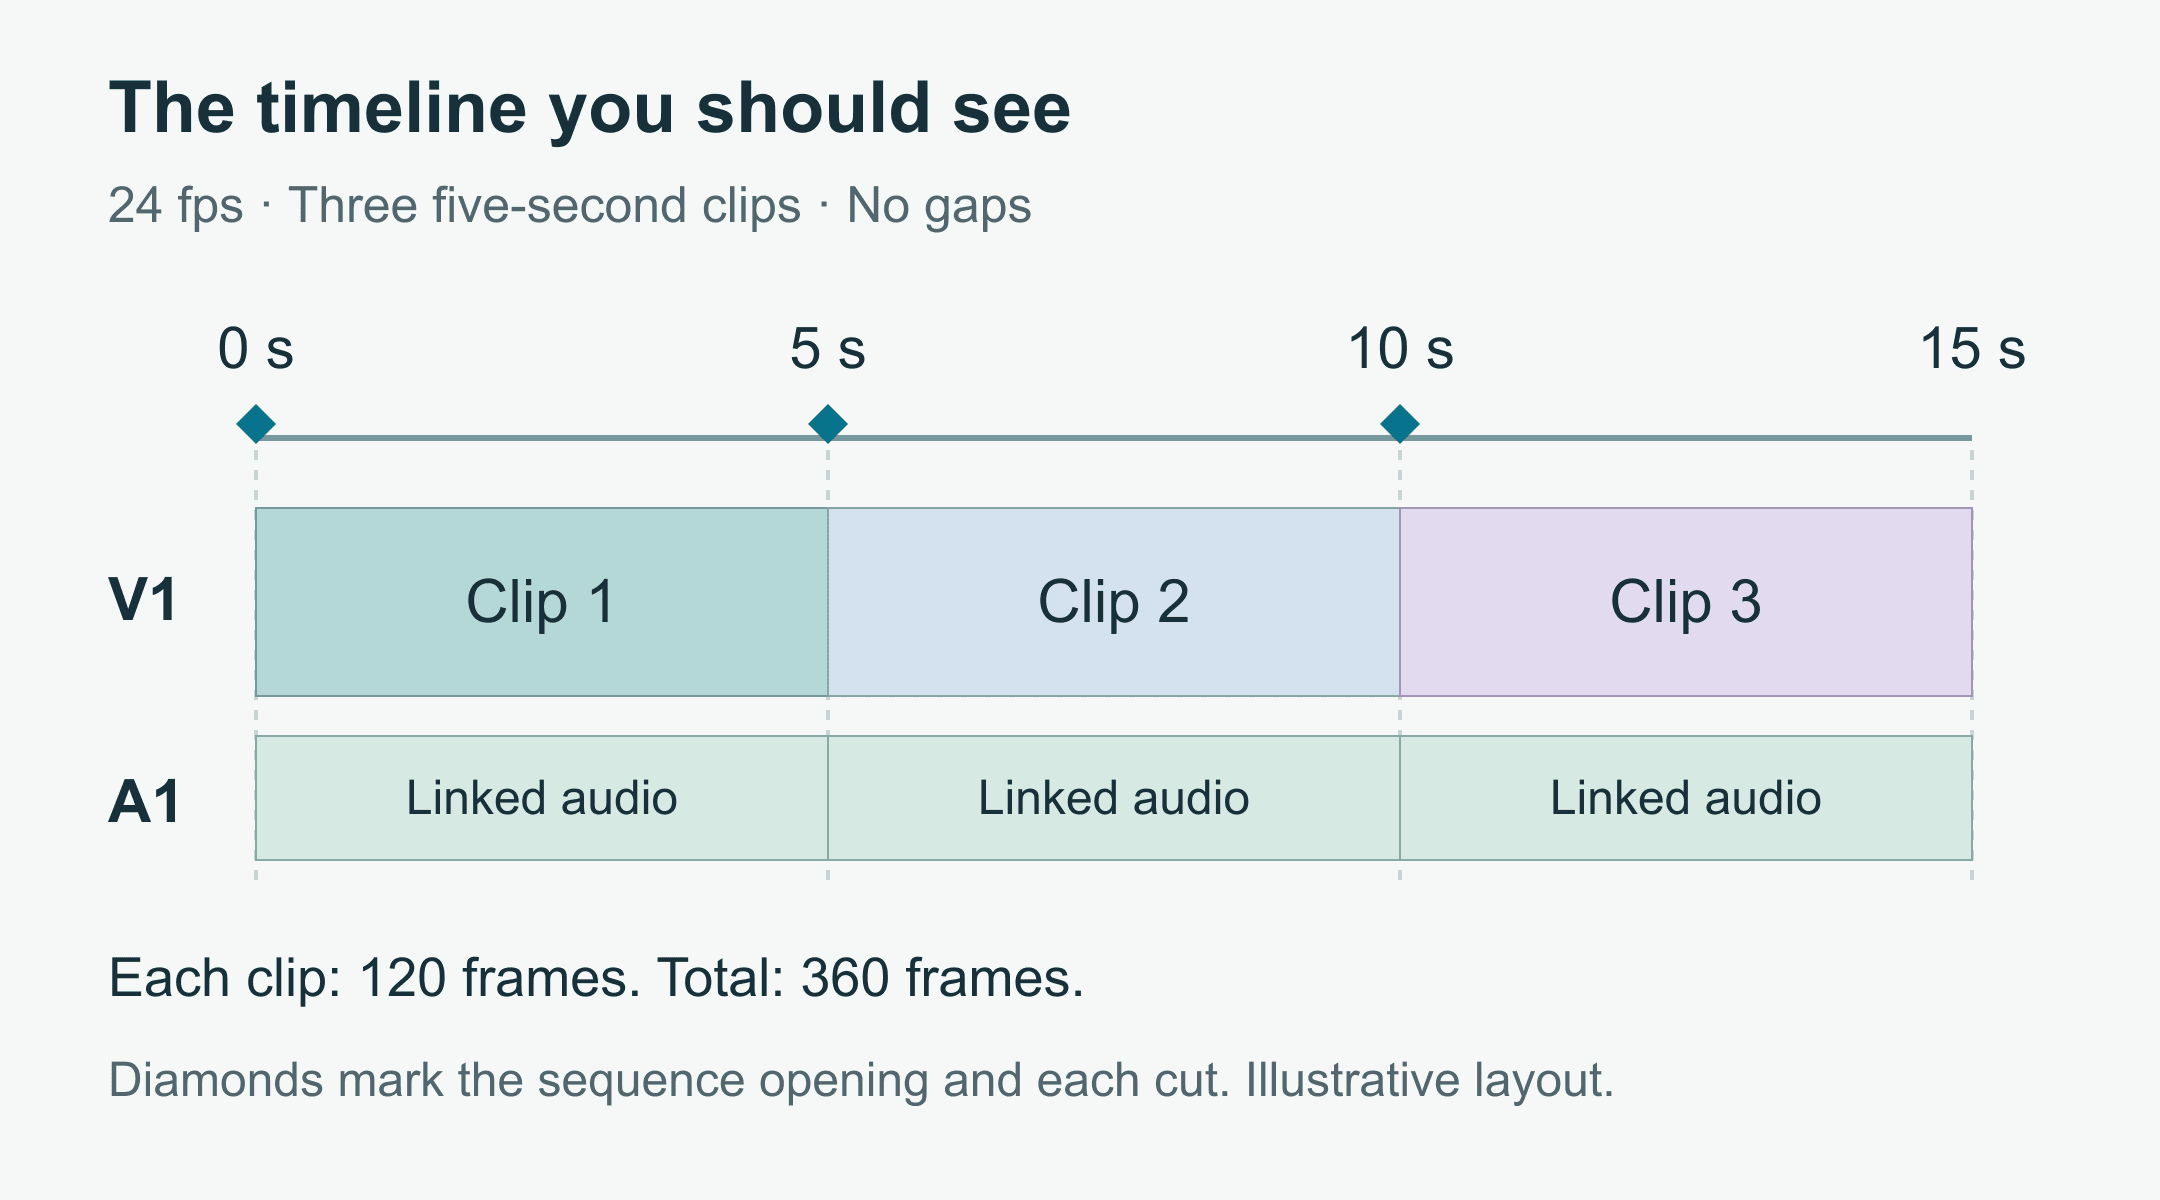
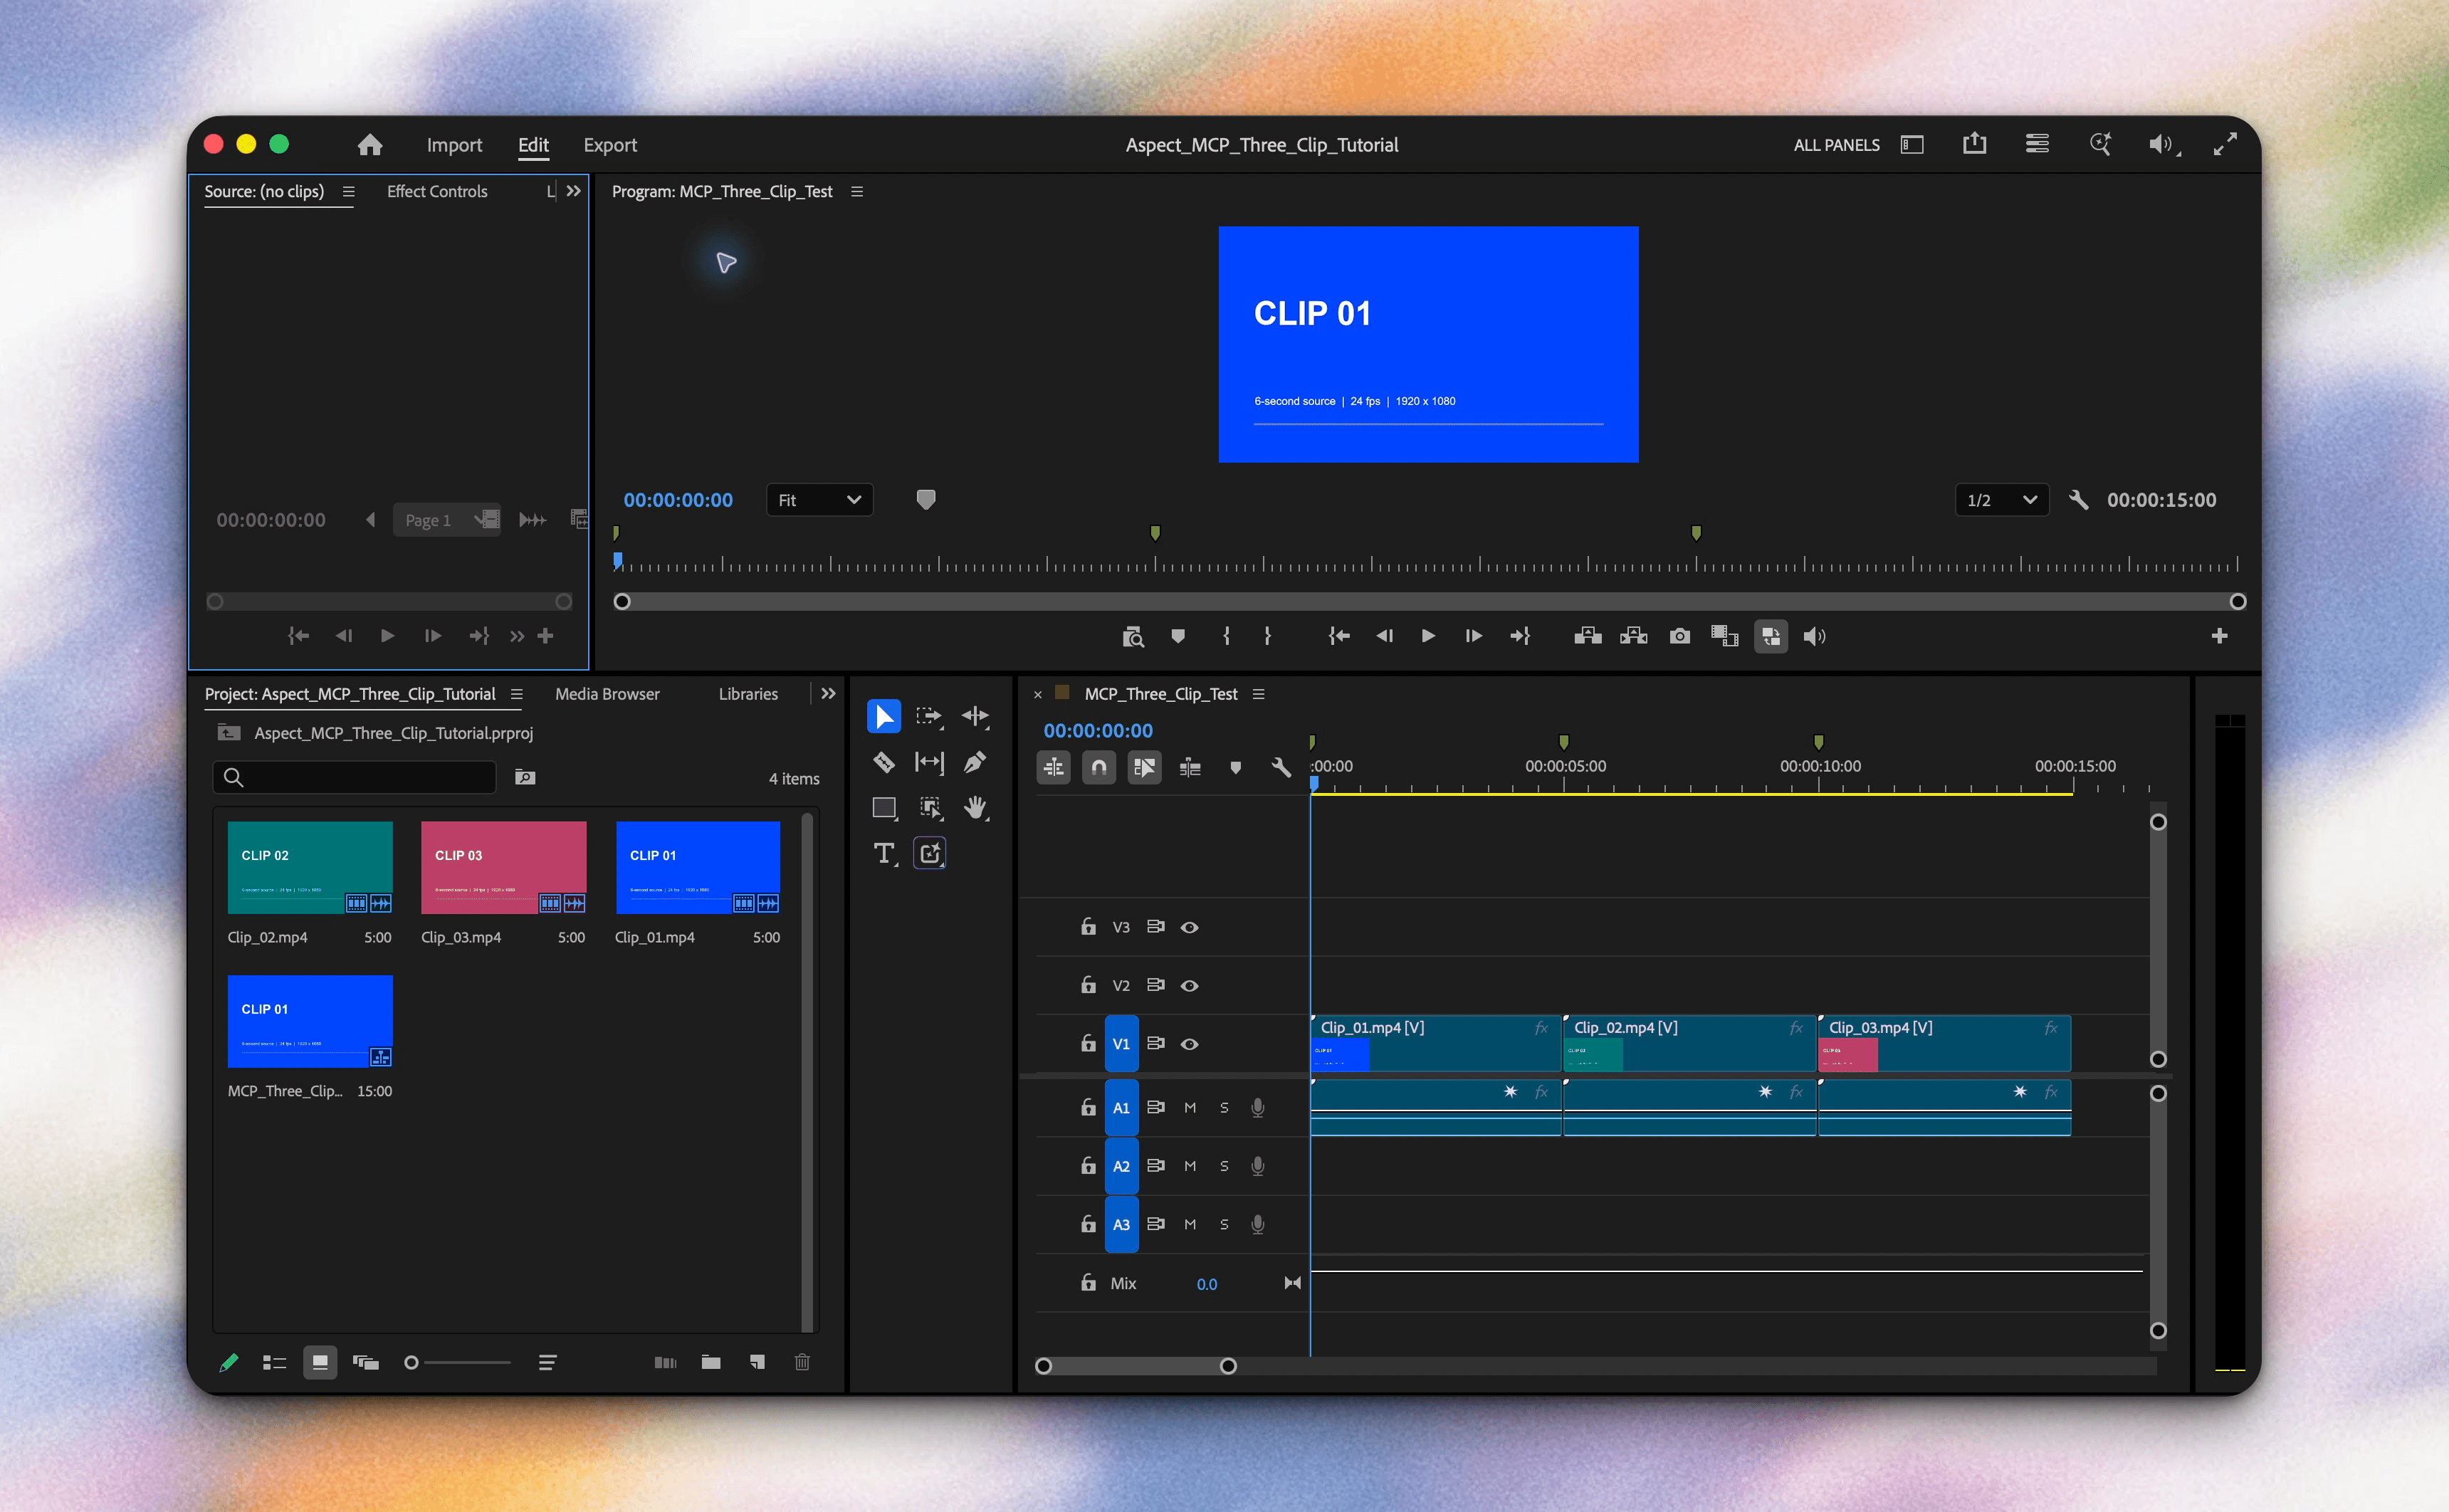
Create a 24 fps non-drop-frame sequence named MCP_Three_Clip_Test with sequence start timecode 00:00:00:00. Use these sequence settings even if Premiere offers to match a clip. Use exactly the first five seconds, or 120 sequence frames, of each clip. Place them in this order on V1 and their linked audio on A1, with no gaps and no overlaps. The first clip should run from 00:00:00:00 to 00:00:05:00, the second from 00:00:05:00 to 00:00:10:00, and the third from 00:00:10:00 to 00:00:15:00. Add sequence markers at the opening and at each cut: 00:00:00:00, 00:00:05:00, and 00:00:10:00. Save the project only after reporting what you changed.
Inspect the result in Premiere
The assistant’s response is useful, but your team should inspect the edit in Premiere before you trust the setup. Open the sequence and check the sequence settings from Sequence > Sequence Settings. For this test, confirm the sequence is 24 fps, non-drop-frame, and starts at 00:00:00:00. Also confirm the frame size, pixel aspect ratio, fields, audio sample rate, and preview settings match the test settings you specified. For real projects, confirm Premiere used the intended delivery settings rather than silently creating a sequence from mixed media defaults. Then inspect the timeline positions. In the Timeline panel, zoom in enough to see the clip boundaries. The first clip should start at the beginning of the sequence. In the 24 fps test sequence, the first cut should land at 00:00:05:00, or sequence frame 120; the second cut should land at 00:00:10:00, or sequence frame 240; and the sequence should end at 00:00:15:00, or sequence frame 360. Use the time ruler, playhead timecode, and clip edges, because the point is to confirm there are no one-frame gaps, overlaps, or unintended trims. Also ask the assistant for a readback of the active sequence structure. You want a report that matches what Premiere shows:- Clip 1: 00:00:00:00 to 00:00:05:00.
- Clip 2: 00:00:05:00 to 00:00:10:00.
- Clip 3: 00:00:10:00 to 00:00:15:00.
- Sequence markers: 00:00:00:00, 00:00:05:00, 00:00:10:00.
Use shared source media without breaking paths
If your team stores source media in Aspect, keep the AI timeline operation and the media handoff as separate responsibilities. Aspect can hold the shared media library, make footage searchable, expose media context to an external assistant through Aspect MCP, and mount files so editors work from consistent paths. Premiere Pro MCP is the editor-side integration that turns local media paths and edit instructions into timeline operations. A clean handoff looks like this: use Aspect to find the right clips, transcript moments, or selects; make those files available through the mounted project path; then give Premiere Pro MCP the local mounted paths and requested timeline ranges. When every editor uses the same mounted root, the resulting Premiere project is much less likely to open offline on another workstation. For proxy workflows, keep the same discipline. Premiere supports ingest and proxy workflows so teams can work with optimized media while preserving originals for finishing. Whether the source comes from shared storage, mounted cloud media, or local editorial drives, tell the assistant to import the same paths your team expects Premiere to use.Common mistakes
Most first-run problems are setup mismatches. Resolve these common mistakes before using a real project:get_capabilitiesshows an unexpected tool set or server identity: re-check that the MCP JSON usespremiere-pro-mcp@1.29.0.- Window > Extensions > MCP for Adobe Premiere Pro is missing: the CEP bridge didn't install correctly, or Premiere needs a restart.
verify_premiere_connectionfails: the MCP client can see the server, but the server can't reach the active Premiere bridge.- The assistant imports media from the wrong location: the prompt used ambiguous paths, or you or the assistant selected the files from a temporary location.
- The reopened project shows offline media: the source paths moved, the mount root changed, or someone opened the project on a workstation without the same media access.
What to try next
Once you've checked that the three-clip sequence saves and reopens correctly, try a ten-clip stringout, a selects sequence with named markers, or organizing clips into bins. Choose one task you need for your project. Give the assistant the relevant file paths, clip order, time ranges, and marker instructions, then inspect the result in Premiere before asking it to do more.Visual references and setup guides
- Watch the maintainer's demo. The original video page includes the demonstration's scope and limitations.
- Connector installation and troubleshooting. Use the setup instructions for the selected package, including its CEP installation and doctor commands.
- Tool reference and source code. Check the selected connector's capabilities and requirements without mixing instructions from another Premiere MCP project.
FAQ
Use the independent premiere-pro-mcp project documented at premiere-pro-mcp.com, and pin the manual setup to premiere-pro-mcp@1.29.0. Pinning matters because another Premiere MCP package uses the same global command name, so an unpinned command can connect your client to a different implementation.
No. A ZXP file is only an extension package until you install it. For this workflow, use the documented command npx --yes premiere-pro-mcp@1.29.0 --install-cep rather than mixing in installation steps from another repository.
The CEP compatibility bridge installs a local Premiere extension panel that lets the MCP server communicate with Premiere Pro. On our Mac, the installer enabled PlayerDebugMode, which allows unsigned CEP extensions in Premiere’s CEP host.
Open Premiere, go to Window > Extensions > MCP for Adobe Premiere Pro, and confirm the panel shows Connector running. Then have your MCP client call get_capabilities to inspect the available tools, followed by verify_premiere_connection as a read-only connection test before making any project changes.
Use the test to check that your assistant can import clips, assemble a sequence, and save a project you can reopen. You should see a 24 fps non-drop-frame sequence starting at 00:00:00:00, three five-second clips on the timeline, sequence markers at 00:00:00:00, 00:00:05:00, and 00:00:10:00, stable media paths, and a clean save, close, and reopen.